# Transfer of Sol between accounts## IntroductionIn this section, we will guide you through the creation of an application. This application will create a transaction that will be signed with the Ledger Nano before sending it to the blockchain.
The purpose of the application is to transfer sol from your solana account on your Ledger to another account.## Tutorial PrerequisitesBefore starting, make sure you have gone through the [prerequisites](../info#prerequisites).### Install the Solana Embedded AppFirst you need to install the Solana Embedded App from Ledger Live as shown in the [prerequisites](../info#prerequisites) for Ethereum.## Tutorial implementationIn this implementation, we will be building a web application with vanilla javascript that uses the USB protocol from a [Ledger package](https://github.com/LedgerHQ/ledger-live/tree/develop/libs/ledgerjs/packages/hw-transport-webusb) to communicate with the ledger.### Project InitializationIt is time to implement the application and test it. First, open a terminal and create a new folder. For this tutorial, the folder will be named "e2e-sol-tutorial”.
Run:```console copy
mkdir e2e-sol-tutorial
cd e2e-sol-tutorial
```Then, initialize the project by running the following:```console copy
npm init
```Answer the questions displayed or by default press enter. There is no incidence on the execution.Run:```console copy
touch index.html
touch index.js
touch style.css
mkdir assets
```Put the logo in the assets folder and name it `ledger-logo`.The folder will contain these files:
_Fig. 1: Folder of the Application_### Code Implementation#### index.htmlIn index.html copy-paste the following code :```html copy
Parcel Sandbox
Click on the bellow button to connect your Ledger Wallet
Solana explorer:
Choose your Wallet
```#### index.jsIn index.js copy-paste the following code :```javascript copy
import * as SolanaWeb3 from "@solana/web3.js";
import TransportWebUSB from "@ledgerhq/hw-transport-webusb";
import Solana from "@ledgerhq/hw-app-solana";
import { listen } from "@ledgerhq/logs";
import bs58 from "bs58";
//Infuria provider for Solana devnet network
const connection = new SolanaWeb3.Connection(
SolanaWeb3.clusterApiUrl("devnet"),
"confirmed",
);
let transport;
let _sol;
let addressWallet;
let recipient = SolanaWeb3.Keypair.generate().publicKey;
let value = 0.1;
let gasPrice;
//listen to all errors thrown by the Transport
listen((log) => console.log(log));
document.getElementById("connect-ledger").onclick = async function () {
//Connecting to the Ledger Nano with USB protocol
transport = await TransportWebUSB.create();
};
document.getElementById("get-information").onclick = async function () {
//Getting an Solana instance and get the Ledger Nano solana account public key
_sol = new Solana(transport);
const { address } = await _sol.getAddress("44'/501'/0'");
addressWallet = new SolanaWeb3.PublicKey(bs58.encode(address));
//Get some properties from provider
const balance = await connection.getBalance(addressWallet);
gasPrice = SolanaWeb3.LAMPORTS_PER_SOL / 100;
//Fill the inputs with the default value
document.getElementById("wallet").value = bs58.encode(address);
document.getElementById("balance").value =
balance / SolanaWeb3.LAMPORTS_PER_SOL;
document.getElementById("gasPrice").value = parseInt(gasPrice) + " wei";
document.getElementById("value").value = value;
document.getElementById("recipient").value = recipient.toBase58();
};
document.getElementById("tx-transfer").onclick = async function () {
//Getting information from the inputs
recipient = new SolanaWeb3.PublicKey(
document.getElementById("recipient").value,
);
value = document.getElementById("value").value;
//Building transaction with the information gathered
try {
const recentBlockhash = await connection.getRecentBlockhash();
const transaction = new SolanaWeb3.Transaction({
feePayer: addressWallet,
recentBlockhash: recentBlockhash.blockhash,
}).add(
SolanaWeb3.SystemProgram.transfer({
fromPubkey: addressWallet,
toPubkey: recipient,
lamports: SolanaWeb3.LAMPORTS_PER_SOL * value,
}),
);
//Serializing the transaction to pass it to Ledger Nano for signing
const unsignedTx = transaction.serializeMessage();
//Sign with the Ledger Nano (Sign what you see)
const { signature } = await _sol.signTransaction("44'/501'/0'", unsignedTx);
transaction.addSignature(addressWallet, signature);
//Serialize the same transaction as before, but added the signature on it
const signedTx = transaction.serialize();
//Sending the transaction to the blockchain
const hash = await connection.sendRawTransaction(signedTx, {
preflightCommitment: "confirmed",
skipPreflight: false,
});
//Display the Solana explorer url on the screen
const url = "https://explorer.solana.com/tx/" + hash + "?cluster=devnet";
document.getElementById("url").innerHTML = url;
document.getElementById("url").href = url;
} catch (error) {
console.log(error);
}
};
```#### style.cssIn style.css copy-paste the following code :```css copy
.modal-content {
width: 300px;
height: 400px;
}
#connect-ledger {
width: 17rem;
height: 9rem;
background-color: white;
border: none;
}
#connect-ledger:hover {
background-color: #edeff3;
}
.modal-body {
background-color: #f7f9fd;
}
#url,
.url {
text-align: center;
margin-top: 160px;
color: green;
}
```### Dependencies Installation#### Install the packagesRun:```console copy
npm install --save-dev parcel
npm install --save @ledgerhq/hw-app-solana
npm install --save @ledgerhq/hw-transport-webusb
npm install --save @ledgerhq/logs
npm install --save @solana/web3.js
npm install --save bs58
```| Package | What does it do? |
| -------------------------------------------------------------------------------------------------------------------------------- | --------------------------------------------------------------------------------------------------------------------- |
| [parcel](https://parceljs.org/) | It is a build tool that will help you package your application to run it in the browser. |
| [@ledgerhq/hw-app-solana](https://github.com/LedgerHQ/ledger-live/tree/develop/libs/ledgerjs/packages/hw-app-solana) | It will help you ask your Ledger Nano to access the solana application on the Ledger Nano. |
| [@ledgerhq/hw-transport-webusb](https://github.com/LedgerHQ/ledger-live/tree/develop/libs/ledgerjs/packages/hw-transport-webusb) | It provides you with all the methods to interact with your Ledger with an USB connexion. |
| [@ledgerhq/logs](https://www.npmjs.com/package/@ledgerhq/logs) | It provides you the log of all the error from your connexion with your Ledger device that may appear when developing. |
| [@solana/web3.js](https://solana-labs.github.io/solana-web3.js/index.html) | It provides you with all the methods to interact with the solana blockchain. |
| [bs58](https://www.npmjs.com/package/bs58) | It provides you with all the methods to compute base 58 encoding. |#### Modify Package.jsonModify the 5th line: `"main": "index.js"` => `"source": "index.html"`Ensure you have this line in scripts:```javascript copy
"scripts": {
"start": "parcel"
},
```Add this at the end of the script:```javascript copy
"alias": {
"@ledgerhq/devices": "@ledgerhq/devices/lib-es"
}
```Your file should know look like this:```javascript copy
{
"name": "e2e-sol-tutorial",
"version": "1.0.0",
"description": "",
"source": "index.html",
"scripts": {
"start": "parcel"
},
"author": "",
"license": "ISC",
"devDependencies": {
"parcel": "^2.3.2"
},
"dependencies": {
"@ledgerhq/hw-app-solana": "^6.26.0",
"@ledgerhq/hw-transport-webusb": "^6.24.1",
"@ledgerhq/logs": "^6.10.0",
"@solana/web3.js": "^1.36.0",
"bs58": "^5.0.0"
},
"alias": {
"@ledgerhq/devices": "@ledgerhq/devices/lib-es"
}
}
```## Tutorial Test### Start the Development ServerNow that the Setup is finished, the app has to be built to be displayed.
Start the development server:```console copy
npm run start
```Now the application is up and running. Open Chrome and go to `localhost:1234`, it will display :
_Fig. 2: Application Running on Browser_### Plug Your Ledger DeviceBefore clicking on the text connect your Ledger to the USB port, unlock it and run the solana application.
The steps are described below.\
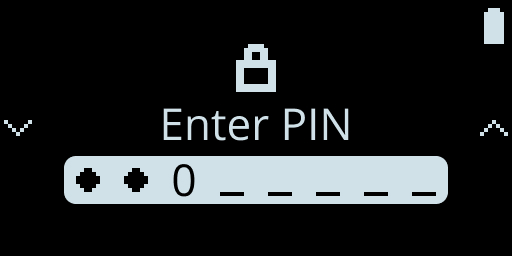Fig. 3: Ledger Enter Code Pin\
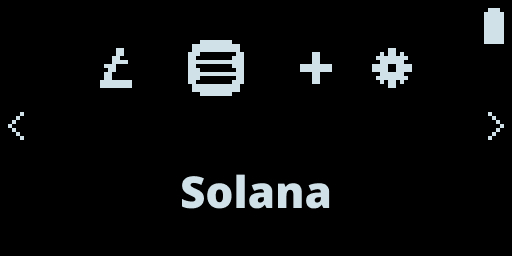Fig. 4: Run Solana Application on Ledger Nano\
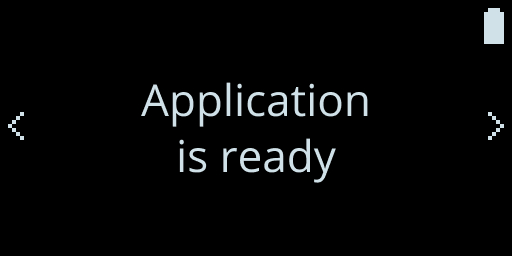Fig. 5: Solana Application is Running on Ledger Nano### Connect Your Ledger to the ApplicationNow you can click on the "Connect your Wallet" button and a modal will be opened.
Click on the Ledger logo.\
_Fig. 6: Choice of Wallet_Now choose the Ledger Nano to connect it to the browser.
_Fig. 7: Connect the Ledger Nano_After connecting the Nano, click on "Get Information". If all goes well, the input fields will be filled with data. The greyed input is not to be changed and it is directly extracted either from the blockchain or from your Ledger Embedded application.
_Fig. 8: Application After Connecting Ledger Nano_### Send Sol token to your Ledger Nano solana accountTo send some sol tokens on the Devnet network, you can either go to one of the solana faucet websites or do it with the solana cli:* [Solana Faucet](https://solfaucet.com/)
* [Solana CLI](https://docs.solana.com/cli/transfer-tokens)If you are looking for the easier and quicker way, use the Solana Faucet. If you would rather use the Solana CLI, please read this documentation to [install it](https://docs.solana.com/cli) before starting sending Sol.The Solana Devnet is not visible on Ledger Live, you can then check the transaction passed on [the Solana Explorer](https://explorer.solana.com/?cluster=devnet).#### Option n°1 - Solana FaucetGo to the [Solana Faucet](https://solfaucet.com/) website put your Wallet Public Key (displayed on the web app) on the input and click on "Devnet"
_Fig. 9: Solana Faucet_#### Option n°2 -Solana CLIGo to the [Solana CLI](https://docs.solana.com/cli/transfer-tokens) website, there are the steps to add some sol to your account.```console copy
solana airdrop 1 --url https://api.devnet.solana.com
```For example```console copy
solana airdrop 1 72tCcW6F4gRWJLCXf3RGejNDZBwUvWCfxHTdxoLGV4ht --url https://api.devnet.solana.com
```### Create a transaction to transfer solNow that the inputs are filled with data. It is time to transfer some sol tokens from your Ledger solana account to another account (you can keep the default account on the "index.js" file).\
Therefore, click on "Create Transaction" to create the transaction which will be signed by your ledger before sending it to the blockchain.
_Fig. 10: Application After Connecting Ledger Nano_When the transaction proceed and finalize, an URL will be displayed on the screen. This URL is a link to Solana Explorer to review the transaction.\
There you can find all the information concerning the transaction you have previously sent.
_Fig. 11: Transaction Information URL_If you go on Solana Explorer you can see the information of your transaction.
_Fig. 12: Result on Solana Explorer after Sending Transaction_
_Fig. 13: Result on Solana Explorer after Sending Transaction_Congratulations, you have successfully built your first transfer application connected with Ledger !!!