# Sign a personal message## IntroductionIn this section, we will guide you through the creation of a web application. This application will connect to your Nano and will display the “test“ message to be signed with an Ethereum account using the personal sign message functionality introduced by EIP-191.Web USB and Web HID applications are implemented with `@ledgerhq/hw-transport-webusb` and `@ledgerhq/hw-transport-webhid` respectively.## Use caseThis tutorial will let you sign a message with your private key in order to verify and prove that you’re the owner of the address.## Tutorial Prerequisites* Ensure you have gone through the [prerequisites](../info#prerequisites).
* Install or update your Ethereum Embedded App to the version 1.9.19 or later.## Coding### App setupFirst, open a terminal and create a new folder in your usual working directory. For this tutorial, the folder will be named “example-sign-personal-message”.Run:```bash copy
mkdir example-sign-personal-message
cd example-sign-personal-message
```Initialize the project by running:```bash copy
npm init
```Answer the questions displayed or by default press enter. There is no incidence on the execution.Run:```bash copy
mkdir src
touch src/index.html
touch src/main.js
```The folder will contain these files:### CodingOpen the folder example-sign-personal-message in a code editor.#### index.htmlIn index.html copy and paste the following code:```html copy
My First Embedded App
```#### main.jsIn main.js copy and paste the following code:> **Warning:** Comment out or remove the Transport package you are not using (
> @ledgerhq/hw-transport-webusb or{" "}
> @ledgerhq/hw-transport-webhid) and the corresponding{" "}
> const. In the example, we use webusb. Webhid is already commented
> in line 8 and line 23.```js copy
import "core-js/actual";
import { listen } from "@ledgerhq/logs";
import Eth from "@ledgerhq/hw-app-eth";
// Keep this import if you want to use a Ledger Nano S/X/S Plus with the USB protocol and delete the @ledgerhq/hw-transport-webhid import
//import TransportWebUSB from "@ledgerhq/hw-transport-webusb";
// Keep this import if you want to use a Ledger Nano S/X/S Plus with the HID protocol and delete the @ledgerhq/hw-transport-webusb import
import TransportWebHID from "@ledgerhq/hw-transport-webhid";
//Display the header in the div which has the ID "main"
const initial =
"
Connect your Nano and open the Ethereum app. Click on “Hash my message”
";
const $main = document.getElementById("main");
$main.innerHTML = initial;
document.querySelector("#hashMessage").addEventListener("click", async () => {
$main.innerHTML = initial;
try {
//trying to connect to your Ledger device with USB protocol
// const transport = await TransportWebUSB.create();
//trying to connect to your Ledger device with HID protocol
const transport = await TransportWebHID.create();
//listen to the events which are sent by the Ledger packages in order to debug the app
listen((log) => console.log(log));
//When the Ledger device connected it is trying to display the bitcoin address
const eth = new Eth(transport);
const signature = await eth.signPersonalMessage(
"44'/60'/0'/0/0",
Buffer.from("test").toString("hex"),
);
const signedHash =
"0x" + signature.r + signature.s + signature.v.toString(16);
//Display your bitcoin address on the screen
const h2 = document.createElement("h2");
h2.textContent = signedHash;
$main.innerHTML = "
Your signed message:
";
$main.appendChild(h2);
//Display the address on the Ledger device and ask to verify the address
const { address } = await eth.getAddress("44'/60'/0'/0/0");
const add = document.createElement("div");
add.textContent = address;
$main.appendChild(add);
} catch (e) {
//Catch any error thrown and displays it on the screen
const $err = document.createElement("code");
$err.style.color = "#f66";
$err.textContent = String(e.message || e);
$main.appendChild($err);
}
});
```## Dependencies Installation### Install the packagesRun:```bash copy
npm install --save core-js
npm install --save @ledgerhq/logs
npm install --save-dev parcel
npm install --save @ledgerhq/hw-app-eth
npm install --save eth-crypto
npm install --save-dev buffer
npm install --save-dev process
npm install --save-dev stream-browserify
```### Install the Transport HID or USB packageThen depending on your choice install one of the corresponding packages:* Install the Ledger package `@ledgerhq/hw-transport-webhid` which provide you with all the methods to interact with your Nano with an HID connection (make sure that you use the 6.27.1 version):
`npm install --save @ledgerhq/hw-transport-webhid@6.27.1`
* Install the Ledger package `@ledgerhq/hw-transport-webusb` which provide you with all the methods to interact with your Nano with a USB connection (make sure that you use the 6.27.1 version):
`npm install --save @ledgerhq/hw-transport-webusb@6.27.1`### Package.jsonModify `“main”: “index.js”` to `“source”:”src/index.html”`.Ensure you have this line in your `package.json`:```json copy
"scripts": {
"build": "parcel build",
"start": "parcel"
},
```And:```json copy
"alias": {
"@ledgerhq/devices": "@ledgerhq/devices/lib-es",
"@ledgerhq/domain-service": "@ledgerhq/domain-service/lib-es",
"@ledgerhq/evm-tools": "@ledgerhq/evm-tools/lib-es",
"@ledgerhq/cryptoassets": "@ledgerhq/cryptoassets/lib-es",
"@ledgerhq/live-network": "@ledgerhq/live-network/lib-es"
}
```Your `package.json` should look like this:```json copy
{
"name": "example-sign-personal-message",
"version": "1.0.0",
"description": "",
"source": "src/index.html",
"scripts": {
"build": "parcel build",
"start": "parcel"
},
"author": "",
"license": "ISC",
"dependencies": {
"@ledgerhq/hw-app-eth": "^6.35.6",
"@ledgerhq/hw-transport-webhid": "^6.28.4",
"@ledgerhq/logs": "^6.12.0",
"core-js": "^3.36.0",
"eth-crypto": "^2.6.0"
},
"devDependencies": {
"buffer": "^6.0.3",
"parcel": "^2.12.0",
"process": "^0.11.10",
"stream-browserify": "^3.0.0"
},
"alias": {
"@ledgerhq/devices": "@ledgerhq/devices/lib-es",
"@ledgerhq/domain-service": "@ledgerhq/domain-service/lib-es",
"@ledgerhq/evm-tools": "@ledgerhq/evm-tools/lib-es",
"@ledgerhq/cryptoassets": "@ledgerhq/cryptoassets/lib-es",
"@ledgerhq/live-network": "@ledgerhq/live-network/lib-es"
}
}
```## Usage### Start the development serverNow that the Setup is finished, the app has to be built to be displayed. Start the development server:```bash copy
npm run start
```Now the application is up and running. Open the browser and go to `localhost:1234`, it will display:### Plug your NanoBefore clicking on the “Hash my message”, connect your Nano to the USB port, unlock it and run the ethereum application. Then, click on “Hash my message”.### Go to your NanoWhen you click on the “Hash my message”, a popup message will be prompt inviting you to sign a message.\
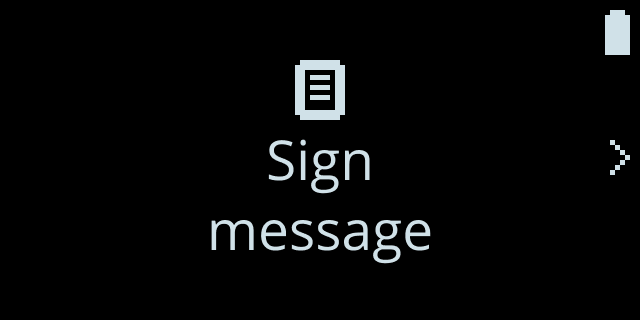Click the right button to see the content of the message that you are going to sign with your Ethereum address:\
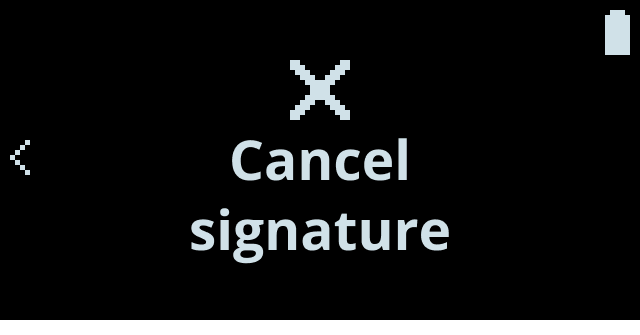
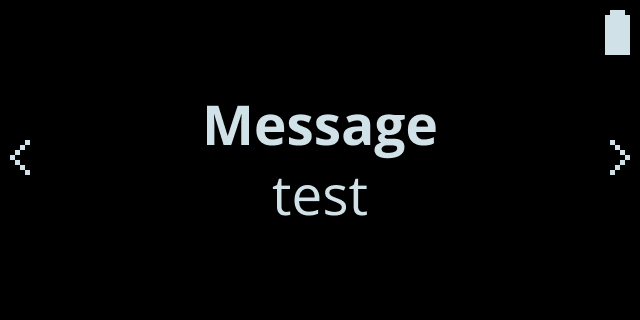### Sign the messageClick the right button to the next screens to sign the “test” message or decline it:\
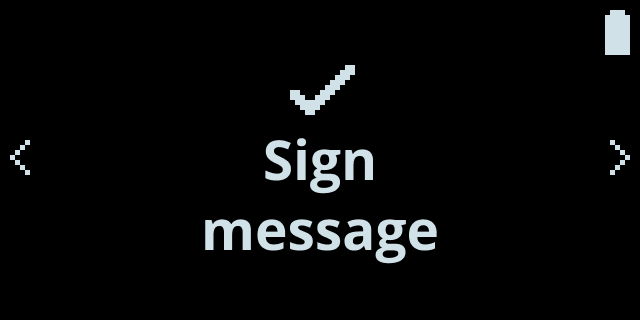\
Once signed, the webapp will display:* The signed message (“hash”)
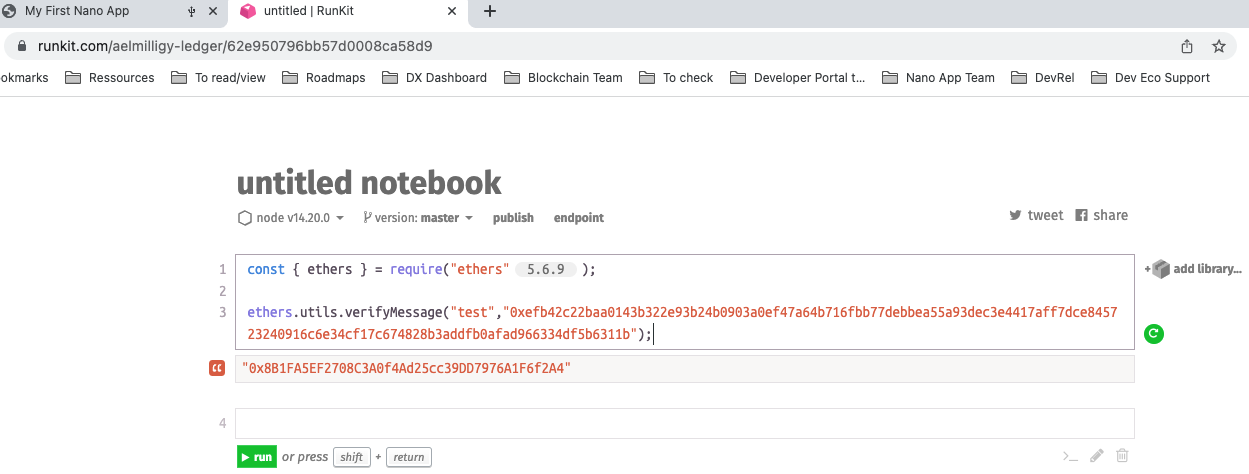
* The Ethereum address used to sign the message### Verify on runkit.comYou can verify that you are the one who signed the message by signing in on [runkit.com](https://runkit.com/home) and running the following piece of code.1) Adapt the code with the message you signed and the hash of the message:```js copy
const { ethers } = require("ethers");
ethers.verifyMessage(
"test",
"0xefb42c22baa0143b322e93b24b0903a0ef47a64b716fbb77debbea55a93dec3e4417aff7dce845723240916c6e34cf17c674828b3addfb0afad966334df5b6311b",
);
```2) Run your code, it should now display the Ethereum address linked to the signed message (the run can take a bit of time):